Saturday, May 30, 2020

Tilda sewing

Hello all,
I just love sewing at the moment. It is so nice to do in the springtime and update a wardrobe with new summer clothes and so on and as a side project for stash-busting purposes to make new dolls.
Tone Finnanger's Tilda books came out so many years ago and as a teenager, I really didn't have money to buy those lovely pattern books and fabrics (I was happy that the library system existed and the post-Christmas sales when the books were cheaper after few years).
I bought a collection of different patterns about two years ago, that needed to be resized when doing a project and finally got the inspiration to finish a pair of giraffes and a set of dolls.
The giraffes are made of trouser fabric that was just a pain to sew, it was so thick. I don't what was I thinking when I decided to use it for toys. I think I even broke a needle when trying to attach the ears and stitching is visible due to the pain of trying to get the ears sewn in their places. But this couple turned out really well. I even remade the girl, because I screwed up the eyes the first time.


The set of girls was just a side project I decided to and I'm happy how they turned out. I have so many scraps from my different dress projects. Problems I had were with the dress, I think I attached the arms too well and the dress bodice didn't fit, so I kinda improvised my own dress for both.
I also like the hair, I bought it from Aliexpress and it is actually quite nice.

So next time when I'm sewing Tilda toys what would be good things to remember?

1) Check the scaling of the printer or copying machine, if the pattern needs to be resized or how many copies you are making. I accidentally hit the wrong arrow kay and almost ended up with 99 leg patterns.

2) Remember to adjust the head pattern well.
I kinda like the head for the dolls to be rounders shape so I do some modifications to patterns. It is just so much easier before sewing and cutting the fabric when drawn on the pattern than the piece you've sewn and cut out.

3) Choose the fabric wisely. Don't be like me and pick a fabric that is too thick


Sunday, May 24, 2020

Failed knitting projects

Hello all,
this week has been quite busy. I've been sewing a lot and starting new sewing projects, I guess I've been bitten with some sort of sewing bug lately. It has been nice to use some of my very old fabric stash.

But this post is about failed knitting projects and my own failed knitting designs I've done during the past couple of years. I can do a post about failed sewing projects later on, with some stupid errors I've made during the years when trying to sew clothes, toys, etc.
I mostly knit toys from my own patterns or I try to come up with a new pattern design. And sometimes the ideas fail totally or there is something just off with the result. These projects mostly end up in a box stored somewhere.
Learning to knit and then processing a pattern idea to a ready pattern is a process. Honestly, I don't like ending up with a weird looking toy that I can't really fix without taking it part and re-knitting pieces. But at least for me, these failed attempts that I've kept these past years are serving as a reminder or a tool to figure out what to do or what not to do with the new projects.
When I was younger and learning I had problems with gauge and the look of the knitted surface. As I grow older and learned to be a better knitter I've been happy with the surface of the toys. They don't have holes from too large stitches and the stuffing doesn't show from decreases or increases.

But with designing I quite often have problems with the proportions of the pieces, something is too small or too big. If I realize my mistake I normally just start all over again, but sometimes I can be in a car or a train or at the summer cottage where I don't have all supplies and I just sew the pieces partially together and then stuff later on and then the result is that the portions are off.

Like these two dolls. I made my grandpa doll a few years ago with almost the same pattern as the bigger doll, but somehow I got the head wrong in the end. He has been in my box of unfinished toys for quite some time now. The head has a tilt and the shape is just not right in my opinion. I think I could've use a bit smaller needles for this doll also.

The other doll was the 2nd attempt on a doll pattern and just wasn't as nice as the first I made, so I haven't had the motivation to finish the clothing and hair. I think I made the head smaller and limbs longer and it just didn't work in the end.

Sometimes I get one part of the design wrong like the shape of the head. Like these two toys, the cat's head looks more like a fox's head and the panda's face looks more like a mouse's face, these are a result of misplaced decreases. Sometimes the decreases can be quite tricky to plan in your head, an idea from a previous toy might not be as good as you thought. Both faces are rip-offs from two different bunny heads and would probably work better with a different animal.

Earlier I had the problems with feet but over the years knitting the feet has become much easier. Maybe the cat could actually have better-looking shoes than these bunny shoes though.

So what are the things that I've learnt from my failed attempts?
1) Knit again if something is off and triple check the numbers of stitches. 
Many times drawing the stitches and increases and decreases on paper does help to calculate the right amount of stitches
1b)Sometimes I've saved the piece that is too small or too big for a future project (mostly those have been crochet projects though)

2) Don't throw away the failed attempt of the pattern you've written down. 
Maybe you can use it as a reference for the next time or use it completely for something else. Right now I'm working on a knitting project that is based on the instructions I wrote in my journal for the mouse looking panda bear.

3) Try different yarn or different sized needles.
If I have a yarn that has a slippery feel to it when knitting I like to use smaller needles. I probably should've used reddish yarn for the cat so I could've turned it into a fox after seeing the face result.

4) Good sketches help and putting down the measurement you have in your head
I'm not really good at drawing, but this is not about the drawing skills, but moving an idea to a visual form. And I've gotten better at sketching down pattern ideas during the years.

5) Don't blame yourself too hard if something isn't right with the first, the second or the third try... Write down the problems and the stuff that you think looks good (or make a mental note of them if you're too lazy write it down like I am most of the time)
That's something I've learnt with sewing, but it applies to knitting and crocheting too.

6) Take time to appreciate how much you've learnt during the time you've been knitting
It is fun to look at the projects I made ten years ago and compare them to the projects I've made recently. There is definitely improvement.

Sunday, May 17, 2020

Sewing toddler clothes (with few tips)

Hello,

these past two weeks I've been sewing a lot and it has been really fun. I've made one dress for myself (that's another post maybe later) and then I've finally some toddler clothes from my jersey and basic cotton fabric stash.
I can't believe how much different small pieces of leftover fabrics I've stored over the years. Now that the situation is what it is and I'm not able to go yarn/fabric shopping without too much stress, I've had time to use my fabric stash.

Set number 1.
I made a subscription to a Finnish sewing magazine called Ottobre and so far I've been actually quite happy with the pattern quality of the magazine. Their sizing is about right and I haven't had too much trouble following the pattern and doing pattern mashups between the issues has been easy enough. They have really good basic clothing patterns for kids with a special twist or two. (Ok, maybe I'll write a better review later, from different magazines, because I've done my fair share of sewing from different patterns over the years...)

So during my stash busting spree, I ended up sewing three sets for a toddler to wear in the summer. Some projects I've had in progress for a long time and others were just projects for a day.

Set number 2.
Set number 1 is from the latest issue of Ottobrekids. I just fell in love with the toddler patterns and I had to sew something. So I made the summer top and short leggings. I used my old fifties style dress that I tore apart. The fabric was old so it tore quite easily and didn't stretch that well -> I had to add snap buttons to the back, but I just love the flower pattern of the fabric. I made the leggings to go with the top, I bought the fabric from sale this spring (it was 5€/meter) and the combo is just perfect.

 The set number has been in progress for months and I've had pictures of it earlier, but now it is finally ready (some finishing touches are still needed to the dress). These were made from patterns that were in one of my older magazines (suuri käsityölehti), published in 2007.
I bought the jersey from a smaller shop probably 1½ years ago and I like the quality of the jersey, should've bought more than just 50cm. 

The dress is made from leftover cotton from two different dresses. I have bought this type of fabric quite many times, so I have quite many different types of small dotted cotton.
Set number 3
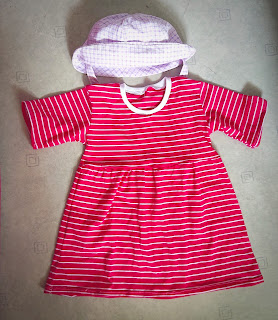
Set number three is a summer hat and a very basic dress. I didn't have a pattern for a basic dress so this is a mashup from a baby body pattern and an overall pattern. It turned out pretty nicely, I'll probably add some extra fabric to the sides of the hem next time, just to make it look better. The fabric is the same as the leggings fabric, just different color.
The hat pattern was also from an old magazine, probably the issue was from the early 2000s and the fabric is also a leftover fabric from an earlier project.

So what did I learn from these projects or do I have any advice for someone sewing toddler clothes?

1. Check the sizing of the pattern, before deciding your project.
It can be hard to measure the toddler, but I've made clothes for babies and toddlers that were way too wide or long. I love it that kids and babies are so different in size, even when they are the same age. But sometimes deciding the pattern size is a bit of a headache and maybe doing a mockup from a cheaper fabric is worth the trouble. And the cheaper version can be used for playing outside or something like that.

2. Think carefully about the material you use
Is cheaper jersey from sale better or the more expensive better quality fabric better? It depends on the purpose I guess. I like to buy good quality fabric for clothes that I want to last longer (like jackets, party dresses) and cheaper to those that are in outdoor use for playing (so I can make new ones the next summer :)
Also, materials that are easy to take care of, are good and I like practical colors that I had food stains.

3. Don't be afraid to tackle difficult patterns or new things in toddler clothes
Like sewing a hidden zipper or adding snap buttons, sometimes the patterns are lacking or there is something that needs to be fixed. Be creative and cute (also safe) details are fun.

 4. Be sure that the clothing is suitable for the toddler in question
 For example: if adding snap buttons, make sure that they are attached properly and don't fall off.

5. Pattern mashups can produce a good result
I haven't practiced making sewing patterns (at all) so I rely on ready-made patterns and sometimes there are no patterns available that match the idea I have in my head. That's when I combine different patterns together, with paper and tape and a ruler. It worked with my shirt dresses and with my toddler dress :)

Sunday, May 3, 2020

Cute little bear (chart pattern free)

Hello,
This was my quick spring project. It is a small keychain teddy bear, done with "Kalalanka", a fine cotton yarn normally used for probably curtains and tablecloths, and so on. I decided to have a little fun with a small hook (probably 2mm) and an afternoon without nothing better to do.
I really like the teddy without any embroidery for the face or I don't actually know what kind of face would be good looking for this little fellow. Probably just eyes?
I decided to write down the pattern as a chart, I haven't done that in ages and I rarely use them myself.

I drew the chart by hand and I'm actually satisfied with the result. It is probably not the best out there, so I added some extra info on the chart also. Finishing the chart required my Muji pens and a couple cups of coffee.  I added the numbers of stitches on the row (except ears) and the explanations of symbols I used. Just double click the picture to get it larger.